This
post was originally published on
this siteOriginally posted at: http://www.nerdfitness.com/
Walk into any gym on a Monday, and there’s a good chance not a single bench will be open.
Because Monday’s are National Bench Press Day.
At least, that’s what it seems like!
For many years now, bench press has been considered by many to be the most important exercise in the gym, so many people put the bench front and center in their training program, before all else.
For the last 30-40 years, the bench press has become the universal lift for bros everywhere to determine out how strong someone truly is. The questions are things like:
How much do you bench?
Do you even lift??
As popular as it is, the bench press in its current form is really less than 100 years old.
In fact, until the 1930’s, people did a movement called the “floor press”, which was similar to a bench press only done from the floor.
In fact, at first many people did a movement called a “belly toss” – where the bar would come down and bounce off the belly to help the lifter get it back up.
The three movements – bench press, belly toss, and floor press were all popular until the 40’s and 50’s, when the bench press started to become more and more popular, as bodybuilders liked how the bench worked their pecs better than the other two movements.
As the bench press became more and more popular, powerlifting emerged in the 1970’s and separated itself from weightlifting as a sport of its own.
And to this day, the bench press is still a somewhat controversial lift.
How’s that for a history lesson! I’ve asked Staci, our lead women’s coach from our 1-on-1 Online Coaching Program to help teach how to bench.
If you’re somebody interested in powerlifting but not sure on your form, afraid to go to the gym, or just looking for the confidence to get started, sign up for a free call with Team NF to learn about how our coaching program could help solve those problems!
You can schedule that call by clicking in the big yellow box right below here. Otherwise, keep reading this post for more killer content on how to level up your bench press!

Why SHould I Bench Press?

The bench press is a great movement to have as a part of your strength program, and one move we consider to be a part of the “big 4” basic lifts.
Some of the issues coaches have with it (such as a tight chest creating bad posture) don’t come from benching itself, but come from bench being one of the ONLY movements in your program, and can disappear when incorporated as a part of a well-rounded strength program.
The bench press is widely known as a “chest” exercise, however, that’s definitely not all it is. The bench uses your shoulders, triceps, forearms, lats, and pecs, traps, rhomboids, and pretty much every muscle in your upper body.
However, the bench press doesn’t JUST use your upper body. When you bench properly, you use your lower back, hips, and legs as well. Just like our other main lifts (the squat, deadlift, and overhead press), the bench press, while putting an emphasis on specific muscle groups, is a full body movement.
Think about it – while you’re benching, the rest of your body is not just lying there doing nothing.
Your entire body should be working – your shoulders are pinched together and your lats are engaged, while your back, hips and legs are tight, stabilizing your entire body to create a solid base and help you generate drive from the round.
How to bench press: The Setup

Today we are going over the basics of how to bench press the best way for a general strength program.
There are many different variations of bench press used by both powerlifters and bodybuilders.
We believe this is the best (and safest) method for overall strength. Just because you see someone benching a ridiculous amount of weight at the gym does not mean they are using proper or safe form.
They could be an advanced athlete who is making compromises to their form (knowingly or unknowingly) in order to bench higher numbers.
What do you need?
- A weight bench with uprights.
- Barbell – the standard weight is 45 lbs, but this may be too heavy to start. No matter how strong you are, I recommend starting with a PVC pipe or broomstick to learn proper form.
- Spotter – once the weight gets heavy (we will discuss options later in case you just don’t have someone else to spot you)
If you like to learn via video, please watch our “How to Bench Press Safely” video from Jim Bathurst, our lead coach from the Nerd Fitness Coaching Program:
How to Set Up A Bench Press
There are many different ways to set up for a bench press – as you’ll see by watching any powerlifting competition, or even by spending just 20 minutes in your local gym.
Some people get on the bench and curl themselves under the bar, some enter the bench from the back and slide in under the bar, and others just lie down and then get tight.

The key here is to set up in a way that helps you get your body tight and ready for the lift.
Before you begin, it might be a good idea to roll the bar forward on the uprights, as this is where you will be lifting it off from.
Having the bar in the same spot in the uprights will help you with a standard set up that is the same every time.
- Squeeze your shoulder blades together (as if you were trying to hold a pencil between them), press your lats into the bench, and raise your chest up slightly towards the bar.
- While you’re doing this, squeeze your butt and plant your feet into the ground. Your entire foot (heels included) should be on the ground, on either side of the bench.
- Keep your entire body tight. The raising of your chest to the bar, squeezing your shoulders together, squeezing your butt, and driving your heels into the ground will create a tight arch in your back. (more on this later). Imagine you are a superhero and pretend you are sucking all the energy out of the room and absorbing it. As you the bar descends, absorb that energy and get ready to explode upward with the bar.
- Your shins should be vertical to underneath you. If they are out in front of you, your feet are too far forward and you won’t be able to generate proper drive.
When you look up, your eyes should be just north of the bottom of the bar – you should see the bar directly above your eyes. Your head, upper back, and butt should never leave the bench.
Note: Some people (including myself) find it easier to get tight in their upper back if they put their feet up on the bench, grab the bar, get tight in their upper back, and then place their feet on either side of the bench one at a time. This is just another method and something you can try out after you get the hang of the bench!
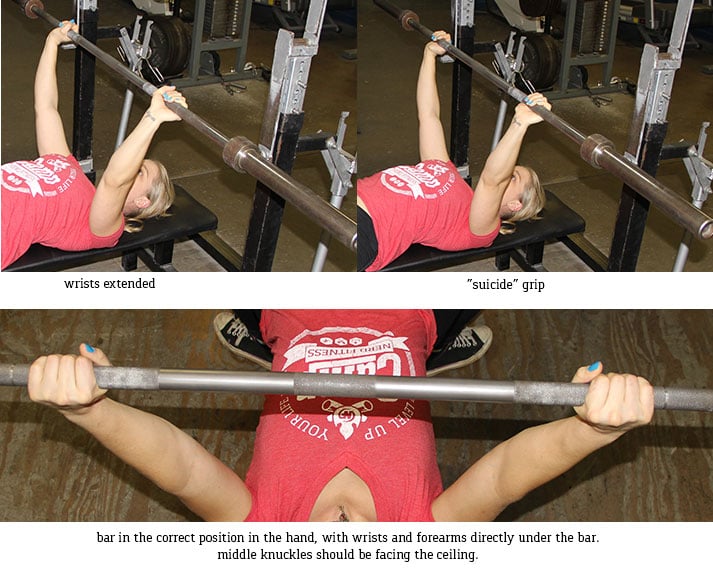
Next, take your arms and put them straight up, and grab the bar. Your grip should be with your thumbs around the bar. A thumbless grip is not to be used on the bench press, as it is unsafe, and often nicknamed the “suicide grip,” as it is far too easy for the bar to fall off of your hands and land on your body (warning: hard to watch).
When you hold the bar, it should be in the heel of the palm (the same spot in your hands as for the overhead press.) Your wrists will not be extended, and your forearms are under your wrists, forming a solid line of support.
If you hold the bar in the upper half of your hand or the fingertips, not only are you not in a strong position, but you could hurt your wrists.
Bench Press Grip
Bring the bar (or, preferably PVC as we are just learning) down to your chest. At your chest, the width of your grip should make your forearms straight up and down (as perpendicular to the floor as you can).
Get a friend to help you (as you won’t be able to see on your own), or tape yourself so you can see. Don’t stress too much about getting your forearms 100% perfectly vertical.
Once you get comfortable with the movement, you may change the width of your grip, as there is wiggle room for personal preference, but this is a great place to start.
Also, keep in mind that your grip may seem way wider or narrower than your friends based on the width of your shoulders. This is normal!
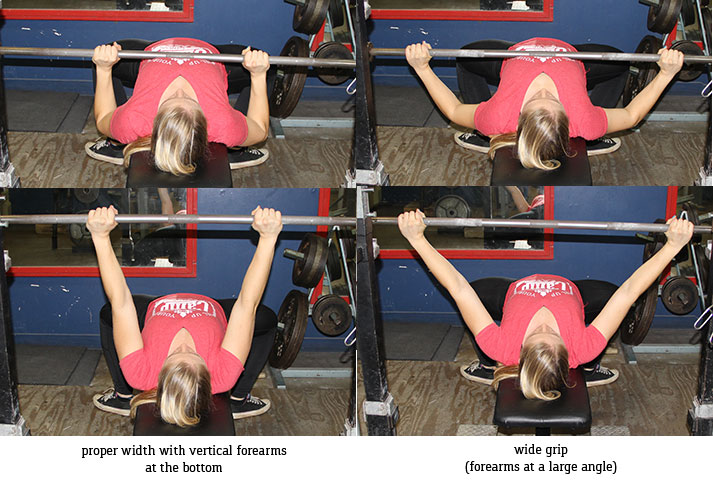
A wider grip is more pec-focused, and a narrower grip is more tricep focused. However, this grip, with your forearms vertical, is the most well-rounded and safest version for overall strength.
You will see powerlifters use a super wide grip because it reduces the range of motion and therefore allows them to lift more weight in competition.
However, more weight does not always mean stronger, and our goal today is safety and strength!
Keep Tight and Build an Arch To Bench Safely

If you’ve set up correctly, your entire body should be tight.
Think of your body as one single unit, not single muscle groups.
Drive your feet into the ground, tighten your entire lower body and core, squeeze your shoulder blades together, and squeeze the bar. You should feel like one solid, single unit.
When you tighten your body, your neck, upper back, and butt should be on the bench (and your feet and heels on the ground).
When you drive your heels through the ground, squeeze your shoulder blades together, and raise your chest to the bar, it will form a small arch in your back – this is natural and what we’re aiming for.
You don’t want to push your lower back into the bench to create a “flat back,” or try to not create an arch.
If you have heard people talking about not using an arch in the bench press, they are most likely referring to the extreme arch used by many powerlifters.
That is not what we are going for here – that is a way to help you lift more weight by reducing the range of motion, and is only safe to look into when you have been benching for a long time and really know what you are doing.
For overall strength, we recommend to bench with a full range of motion instead of trying to reduce it.
Now, feel how tight your body is? It is very important that you keep this tightness throughout the entire movement.
Okay, I’m ready! Can we bench already?
Now that we are set up, and we have our hands around the bar, we want to think about not letting our elbows flare out, and having them tucked in.
One way to do this is that when you grab onto the bar, think about trying to bend it in half upwards towards the sky.
This “upward bending” cue will also help you engage your lats, which don’t actually help you with the press, but do help you keep your body tighter.
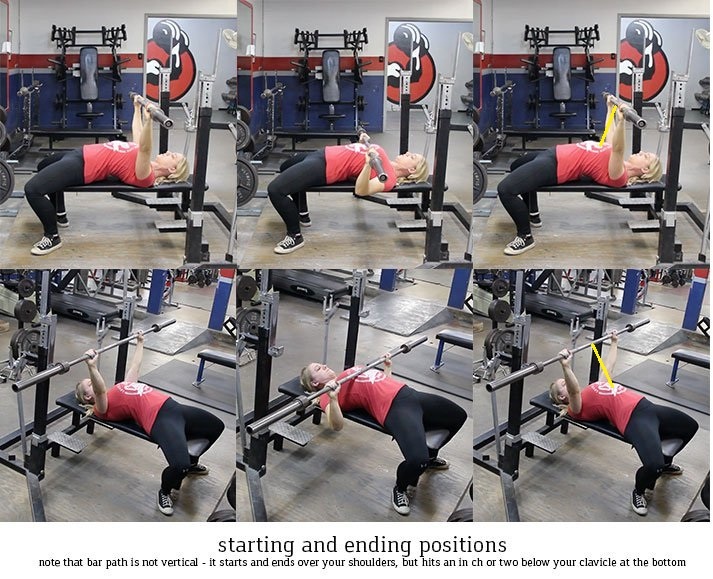
Now, unrack the bar and position the bar directly above your shoulders (without losing tightness – keep squeezing your shoulder blades together!).
Continue to look up at the ceiling, unlock your elbows and lower the bar to your chest. Don’t just drop the bar to your chest – you want to pull it down towards you with control.
At the bottom of the movement, you want the bar to touch a few inches below your clavicles. If it’s up by your throat or on your stomach, it’s in the wrong position.
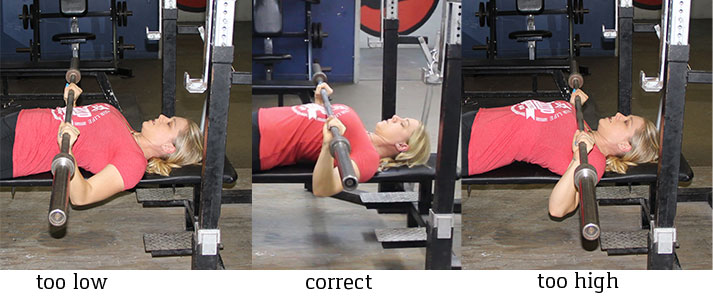
Once the bar touches your chest, press up to put the bar back in its starting position.
Note that unlike the deadlift and squat, that this bar movement will not be in a straight up and down motion. Because of our anatomy, the bar will follow a slightly curved path down, and then follow the same path back up.
While pressing, remember to keep your elbows tucked in, and don’t let them flare out. Think about squeezing so that your biceps touch the side of your chest (though you wont be close enough to have this happen), or try to get your elbows under the bar.
You don’t want to be too tucked though – the goal is about a 45 degree angle (see photo below in common faults).
As you press, the same parts of your body that were touching the bench before should still be touching the bench, and your feet should still be on the floor. Don’t let any of them (the most common is your butt) come off the bench.
To help prevent your butt from coming off of the bench, instead of pushing up when you drive with your heels, think of pushing up and back, towards the front of the bench (where your head is).
To re-rack the bar, move the bar backwards to the uprights and touch them with the bar, and then let go of the bar. Don’t look at the racks, you know that they are there! For beginners, it’s great to have a friend help you guide the bar back to the right position in the rack.
What’s a Beginner Bench Press Weight?
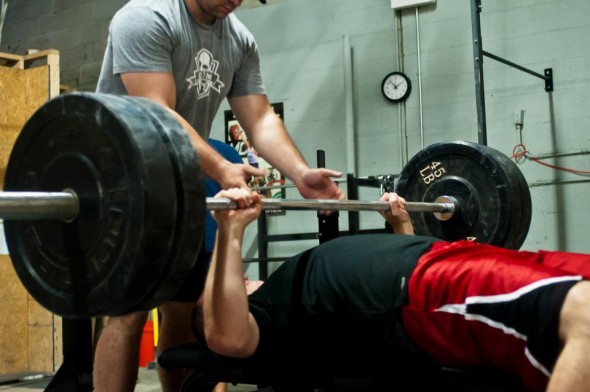
Okay okay, you’re wondering how much you should put oh the bar as a beginner who is starting out with bench pressing.
This is a very important question, and for somebody that is trying to level up as quickly as possible, you’ll be tempted to put WAY more weight on the bar than you can probably handle.
In other words, your ego is writing checks your body can’t cash.
So here is what you are going to do.
Check your ego, and start with:
The bar. And ONLY the bar.
Your ego will survive. I promise.
As we cover in our extensive guide: “How Much Weight Should I Be Lifting?“, you should ALWAYS start every session with just the bar.
Hell, even veteran power lifters who can bench press 500+ pounds will always start out by just bench pressing the bar.
You can too. Nobody in the gym cares. I promise you.
NOTE: The bar STILL weighs 45 pounds, which MIGHT be too heavy for you. That’s okay! You don’t go to show people how strong you are at the gym, you go to the gym to get stronger.
So start by making sure 45 pounds isn’t too heavy for you. If you are even SLIGHTLY concerned that it might be, consider using dumbbells or finding a smaller/lighter barbell in the gym and using that to build up to the strength with the bar.
HOW TO BENCH PRESS MORE:
Now, if you can benchpress the bar safely, great.
Do 3 sets of 10 on your first day in the gym.
When it’s time to bench press again, add 2.5 lbs (1.2KG) to each side of the bar, and repeat.
You’ll then be lifting a total of 50 lbs.
Each week, add 5 pounds total (2.5 to each side) to the bar. This will be “slow going” at first. However, even at a paltry 5 pounds per week, you’ll rapidly reach a point in the next 6-12 months where you’ll approach a weight you can no longer lift.
“BUT STACI, I CAN LIFT WAY MORE THAN THE BAR, WHY START THERE?”
Because you need to train your body correctly, and we’re looking to build momentum. When you practice perfect form with light weight, your body starts to learn the proper pathway for the bar, your muscles, tendons, and joints all learn how to bear the load of a weighted bar.
And each week, you get slightly stronger.
Repeat this week after week, combine it with a diet to get stronger, and you will build muscle like a superhero!
Common Bench Press Faults and Mistakes
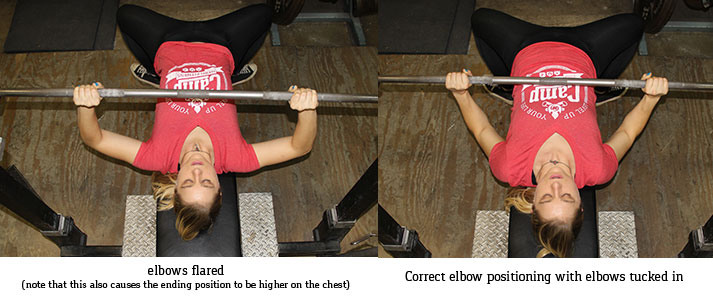
- Not keeping body tight – As soon as you lose tightness, you have the potential for missing the rep. Make sure even when you are warming up and the weight is light, that you keep your entire body tight.
- Butt coming up – make sure your butt stays on the bench at all times! It’s easy to let it come up off the bench once the weight gets heavy and you really start driving through your heels. Instead of thinking about driving upwards through your heels, think about driving up and backwards. If you’re struggling with your butt coming up, either try putting plates under your feet or re-evaluating your foot position (or lower the weight).
- Bouncing off your chest – when you come to the bottom part of the lift, don’t bounce! Lower the bar to slightly graze your shirt, and then press.
- Half reps – One of the most common faults I have seen in the gym! Make sure you are hitting full range of motion every single rep (down to chest!).
- Wrong starting, middle, and ending positions (pictured below) – we’ve learned in the past that a vertical line is the most efficient way to move a bar, but with the bench press, the safest is to move the bar at a slight curve. The bar will start and end above your shoulders, but the middle point of the bar will be below your clavicles. If your middle position is above your shoulders, in a vertical line, your middle position is too high.
HOw to Ask for A Spotter with the Bench Press

Spotting is a very important part of bench pressing – not only having someone spot you, but having you spot other people. It can be extremely dangerous to bench press alone.
A spotter’s purpose is to ensure the safety of the lifter – not to help the lifter with reps.
The spotter always watches every rep while staying out of the way.
The only thing they may help with is giving you a lift off, but after that, it is all you!
*A lift off is when you help the lifter take the bar out of the rack, and then let go of it when it is in the correct starting position.
You don’t need a spotter for your warm up sets, but everyone should have one for their work sets.
How do you ask someone to spot you? “Hey, will you spot me real quick?” usually works (it’s really that simple!). I’ve never had anyone turn me down.
If you’re always at the gym at the same time as someone else, make friends and spot each other. That way you’re not always nervous asking someone random to spot you.
If someone asks you to spot them, always ask how many reps they are going for, if they want a lift off, and how they would like to be spotted.
Some people don’t want you to touch the bar unless they tell you to; others want you to help them guide the bar up if they start to fail, and others want you to take the bar immediately if they fail the rep.
Some want a lift off, and some don’t.
When you ask someone else to spot you, they will probably ask you the same questions!
What if I don’t have a spotter? Can I bench press without a spotter?
If you don’t have a spotter, you can use the power rack to bench. NF Coach Jim demonstrates here:
Just set the pins at a level just barely below your chest, so if you miss a rep you can get out.
If you don’t have a power rack, and absolutely don’t have a spotter – you can either not put clips on the bar, and then let the weight slide off one side at a time, or do the “Roll of shame,” where you roll the bar down your body, sit up, and pick up the bar.
However, both of these methods are dangerous and you’re risking injury by doing them. Please do not bench press alone – especially when just starting out. Even if the weight seems light, it’s very possible to injure yourself.

The best thing you can do is to ask someone at the gym to spot you.
There’s nothing weird about it all – in fact, it’s normal and expected!
If that’s not an option, consider dumbbell presses or another chest exercise until you can find a spotter.
Frequently Asked Questions about Bench Press
“I see people with their feet up on the bench – what’s going on?”
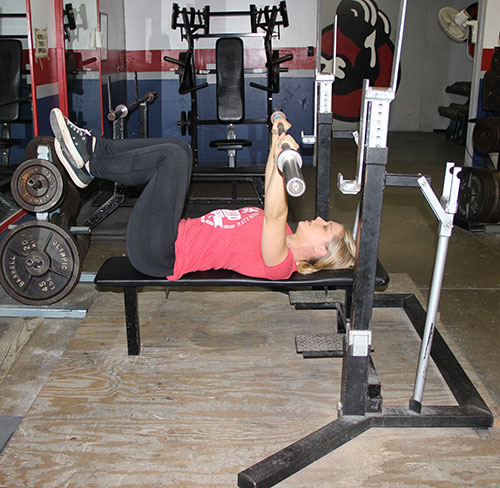
This isn’t technically correct – but it’s really a completely different movement than your standard bench press. It eliminates the use of the lower body in the movement, and can be good for people with injuries or as an assistance exercise.
I’ve seen it the most in bodybuilding routines. We recommend you stick to benching like a superhero until you master the movement.
“If the bench is one of the ‘big 4’, why do some people not bench press?”
While the bench press is a great way to build strength, but out of the big 4, it is the lift that has the most alternatives available.
While it’s hard to replace a heavy deadlift, you can easily replace bench press with pushup and dip variations and continuously get stronger with just your own bodyweight for a very long time.
I personally keep bench in my program because I enjoy it, but also because it’s a competed lift in powerlifting.
Steve, however, has chosen to not bench press and replaces it with bodyweight variations of pushups and a lot of gymnastics ring work.
“Okay, I get it! What do I do now?”
Incorporating bench into your program is easy.
It’s found in the Nerd Fitness Academy workouts, and a big part of our Coaching Program for people who are interested in powerlifting.
A great place to start is to add it in, once a week, and do 5 sets of 5 reps each (after warmups).
If you want somebody to build a custom training program for you, check your form, and keep guiding you on your journey, sign up for a free call to learn more about our coaching program by clicking in the box below!

So that’s all there is to it! Next time you are in the gym, give it a shot! Start with just the bar, and add weight each time when you hit your weights. Just don’t forget to have a spotter!
So, what kind of benching questions do you have for us!?
-Staci
PS: Don’t forget to check out our other articles in the Strength 101 Series!
###
photo source: leg0fenris: legos, Alexander Danling: Benches, Christian Hernandez: Superman



 This meal adds new flavors to the leftover short ribs from last week’s comfort food





 For now classes are 6pm and 640pm at 2840 Wildwood st in the Boise Cloggers studio.
Book your class NOW!
click this ==>


